
Create a Panel using Illustrator and Horizon EDA
7 years ago
In this Blog post I try to capture my workflow for Panel creation using Adobe Illustrator and Horizon EDA. Instead of using Illustrator you might use any Software capable of exporting vector shapes as a dxf. The idea is to go from your vector graphics software to a Gerber File, so you end up with a manufactured PCB.
1. Designing the Panel
When designing a panel in Illustrator I try to seperate things into layers that make sense. Most importantly:
- Guides
- Hardware (Knobs, Jacks, ...)
- Mill (everything that is cut out of the shape in the end)
- Graphics
- Background
Out of these only two are really relevant for the final Gerber file: Mill and Graphics. Go ahead and play around with your design until it looks nice and you are sure the underlying parts will fit neatly onto the PCB. Also remember: the Panel is bigger than the PCB!
2. Preparing for Export
Horizon has a Import DXF command. As for now there are two limitations with this:
- it only understands straight lines (no splines or arcs)
- it doesn't understand shapes with holes (aka islands) in it
Luckily there are ways around this.
2.1 Convert Text to Outlines
You probably used text and lines/paths in your design. Before going any further you need to convert these to shapes:
Rightclick all Text fields and Click on Create Outlines to convert Text to shapes
2.2 Expand Lines to Outlines
Select all Lines and Paths and in the mene run Object -> Expand or Expand Appearance depending on the kind of objects you selected.
2.3 Unite overlapping shapes
If you have overlapping shapes, unite them using the Pathfinder operation. If you have holes you wanna cut out use the Minus Front Operation.
2.4 Cut Islands
Horizon will be unhappy with closed shapes that have a hole in them. Use the Knife tool to cut these apart. The goal is to have seperate shapes without without holes:

2.5 Convert all curved Outlines to Straight ones
Horizon won't be happy with splines or arcs. In order to get the shapes we designed we use a combination consisting of two steps:
Object > Path > Add Anchor Pointto "subdivide" a round shapeObject > Path > Simplifyto straighten the resulting lines
It can make sense to map the Add Anchor Point Action to a keyboard shortcut, because you are gonna use it a thousand times:
For the Simplify Step make sure to select Straight Lines and use a Angle Threshold (so you don't have a thousand unecessary points on a straight line):

Make sure to simplify all shapes. As you can see with the letter "N" here, it also uses splines, which could be easily overlooked.
3. Export from Illustrator
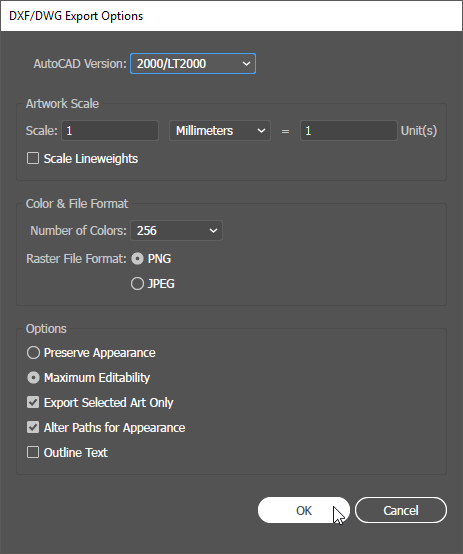
Once you are done you can export with File > Export Make sure to select AutoCAD Interchange File (*.DXF) from the Dropdown menu and click Export. Select 2000/LT2000 as a AutoCAD-Version and tick Maximum Editability and Alter Paths for Appearance. Export seperate dxf files for each of the sides of the shapes you cut with the Knife tool in step 2.4.
See my export settings below:
4. Import to Horizon
The goal here is to create working polygon shapes. You might need several tries and a bit of back and forth between Illustrator and horizon to get it right. In the Board editor
- press Space to get the spacebar menu. Type "DXF" and select
Import DXF. Browse to the file you exported from Illustrator and select the target layer. It helps to include a board outline for positioning. - use the
Line loop to polygontool (again in the spacebar menu) to convert the shape outlines to polygons - if this doesn't work try to set the weight of all lines to 0 or go back to illustrator..